GodTierPH guild emblem GODTIERPHRise Above. Fight As One.

STRATEGY - MAIN LEAGUE

Push MID, reset, rotate.

Use this page during command calls. The maps show each step first, with the written instruction directly below.

STRATEGY OVERVIEW

Win MID first, then rotate as one.

Team 1 anchors TOP, MID, and BOTTOM while Team 2 acts as the rotating force. We break the first two MID towers, fall back before the third, wipe the enemy push at MID, then rotate BOTTOM and TOP only after regrouping.

TEAM SETUP

Read your role first.

Team 1 - Party 1

TOP

Stay at TOP. Offline (Alithea) will roam and assist TOP when needed.

Team 1 - Party 8

BOTTOM

Stay at BOTTOM. Spellflight (Alithea) will roam and assist BOTTOM when needed.

Team 1 - Parties 2 to 7

MID

Stay at MID. Control and defend MID.

Team 2 - Parties 1 to 4

ROTATION

Start at MID and rotate when instructed.

CLASS GUIDELINES

Combat notes.

Wizard / High Wizard

  • Get Storm Gust.
  • Get Lord of Vermilion.
  • Continuously spam AoE skills during clashes.
  • High-DPS Wizards should also use Meteor Storm.
  • Focus on AoE damage and crowd control.

Alithea

  • Get Gravity Well for the 1-second stun.
  • Get Glacial Stomp for the 1-second freeze.
  • Build more survivability with VIT + Goibne Set if possible.
  • Enter the enemy group.
  • Use Glacial Stomp + Gravity Well.
  • Get out and reposition immediately.

Night Watch

  • Spam Blazing Cavern during clashes.
  • Get Concussion Grenade Lv. 3 for the Slow debuff.
  • Pistol builds should spam Desperado + Fire Dance.
  • If you have a Familiar Card, use it.

Assassin Cross

  • Focus on Poison debuffs.
  • Keep applying pressure to enemy players.
  • Target vulnerable and high-priority enemies when possible.
  • Build more survivability with VIT and Odin or Goibne Set.

Sniper

  • Focus on eliminating enemy players during clashes.
  • Prioritize high-DPS and high-damage targets first.
  • Stay behind the frontline and reposition after each push.
  • Once the clash is won, immediately switch focus to the tower.

Lord Knight / Paladin

  • Focus enemy DPS first, especially Snipers and Wizards.
  • Hold the frontline and protect key teammates during pushes.
  • Do not play too aggressively or chase too deep.
  • Push forward only when the commander calls for Guard or a protected engage.

Champion

  • Focus on killing enemy Snipers and Wizards.
  • Roam TOP and BOTTOM to help the teams assigned to those positions.
  • Look for one-shot openings whenever possible.
  • After securing a pick, reset back to the team formation and follow the next rotation call.

Priest / High Priest

  • Add Auto Heal and Resurrection to your skill setup.
  • Keep Resurrection ready for key players who go down.
  • Spam Sanctuary when Assassin Cross, Lord Knight, Paladin, or pistol Night Watch players push straight into the enemy to use their skills.
  • Stay protected and keep healing through the clash.

STRATEGY STEPS

Follow the order.

1

Starting Position

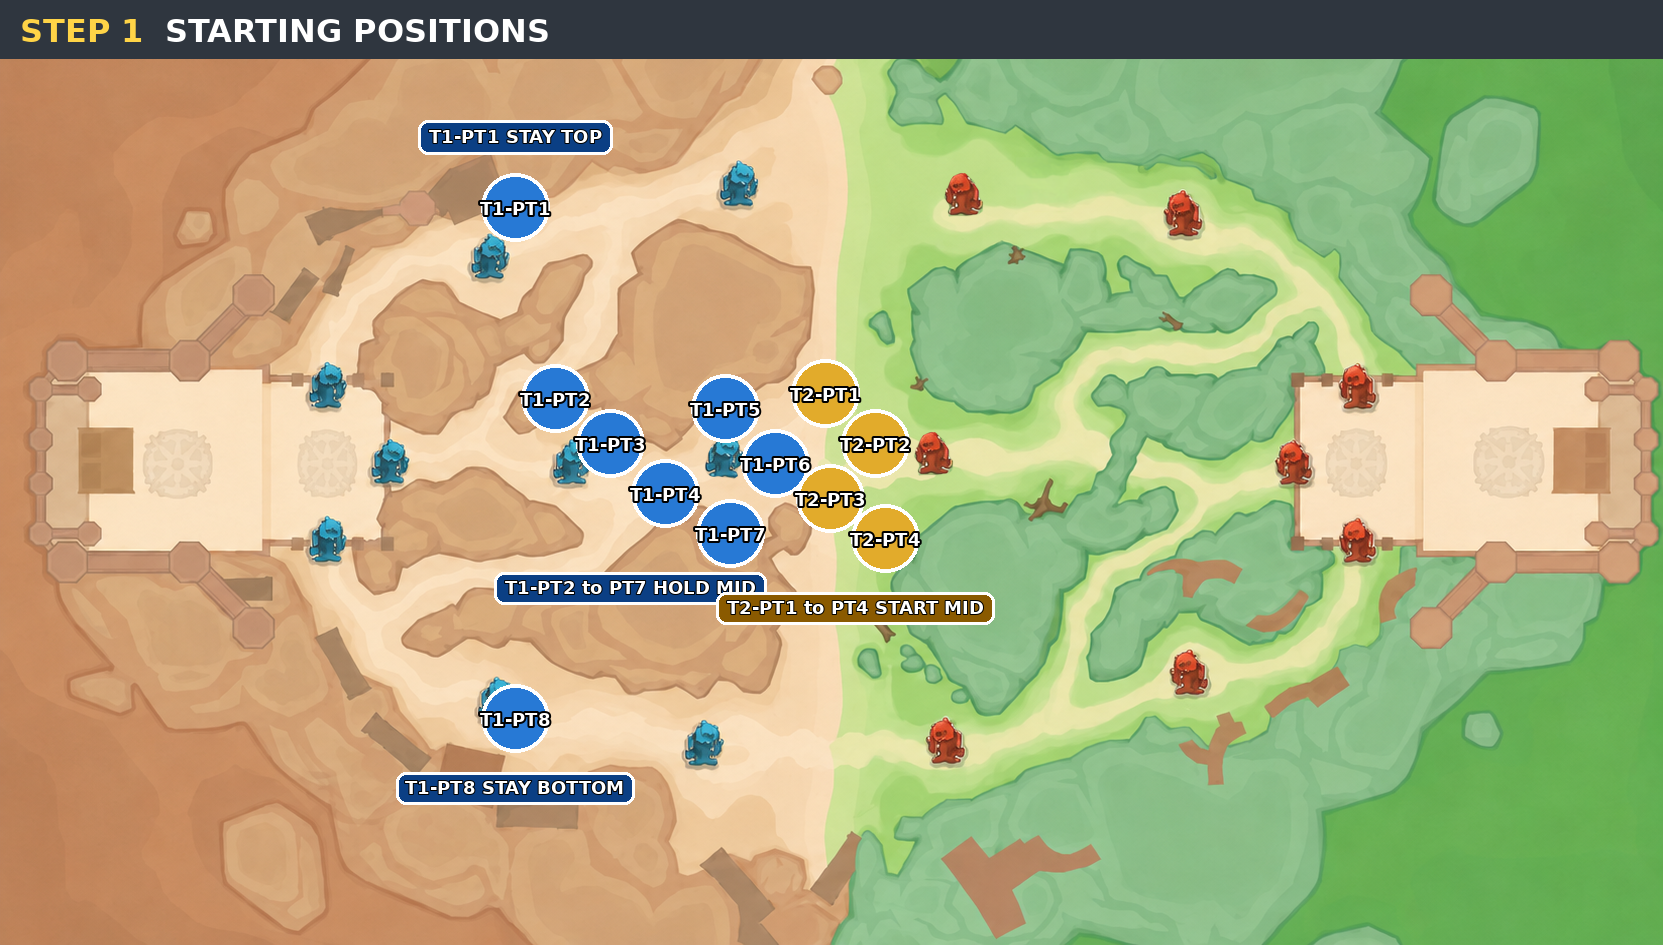
Step 1 starting positions map showing Team 1 Party 1 at top, Team 1 Parties 2 to 7 at mid, Team 1 Party 8 at bottom, and Team 2 Parties 1 to 4 starting mid.
  • Team 1 Party 1 stays TOP.
  • Team 1 Party 8 stays BOTTOM.
  • Team 1 Parties 2-7 stay MID.
  • Team 2 Parties 1-4 also start MID.
2

First MID Push

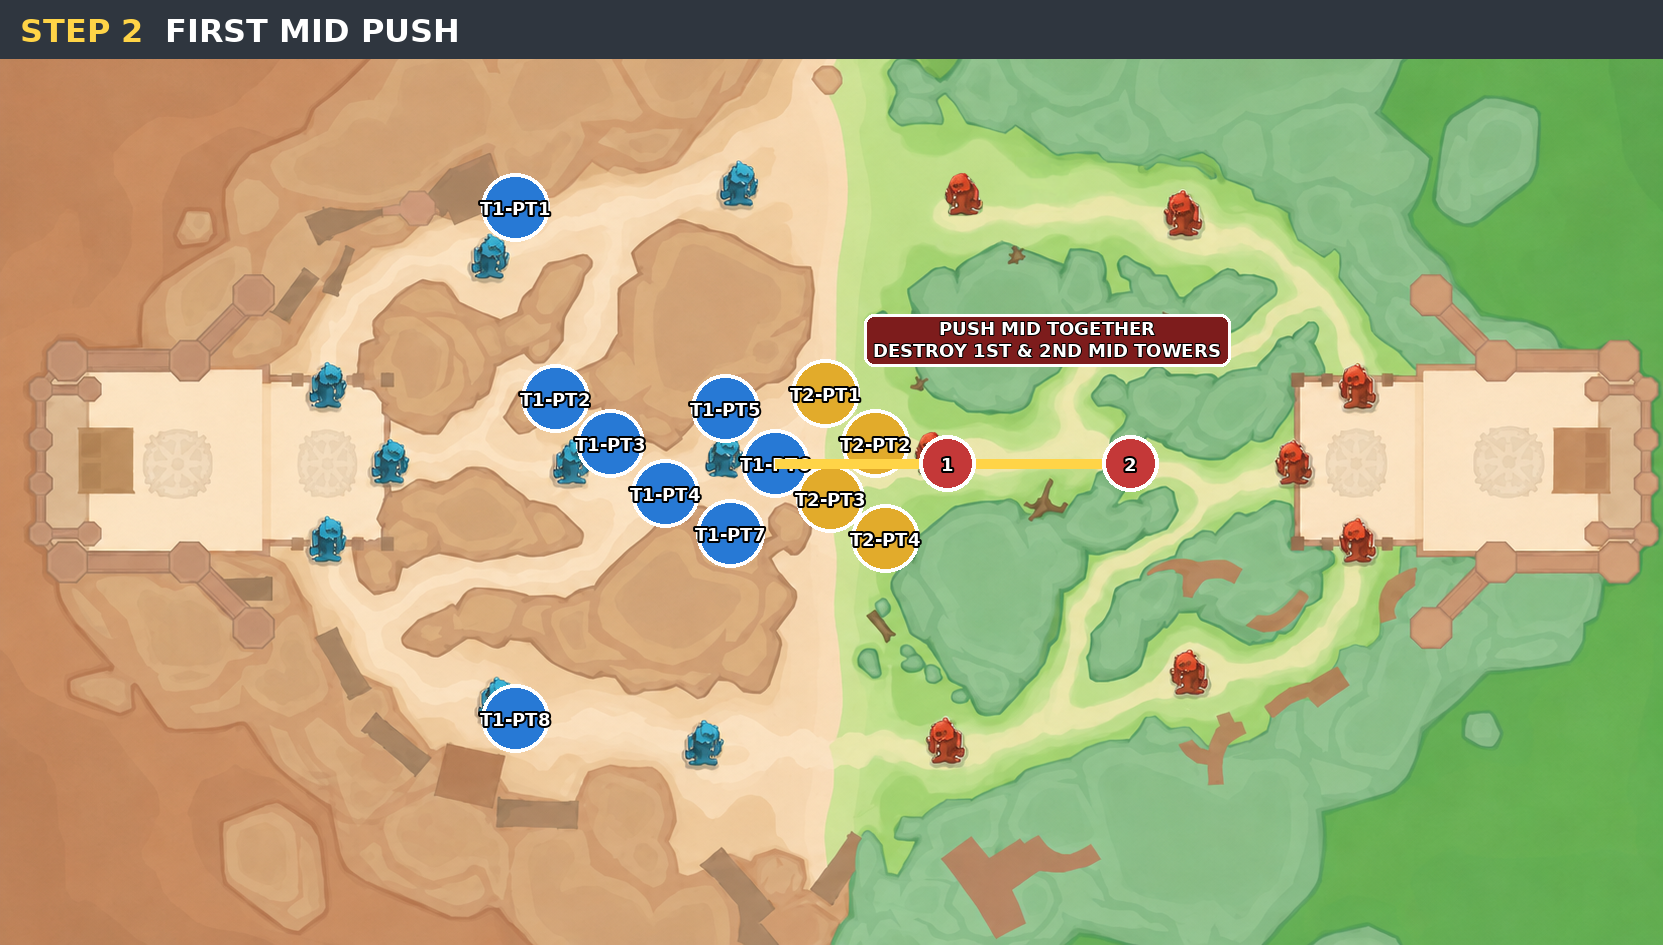
Step 2 first mid push map showing the mid group pushing together to destroy the first and second enemy mid towers.
  • Everyone assigned to MID pushes together.
  • Destroy the enemy's 1st MID tower.
  • Continue and destroy the 2nd MID tower.
3

Do Not Push 3rd MID Tower

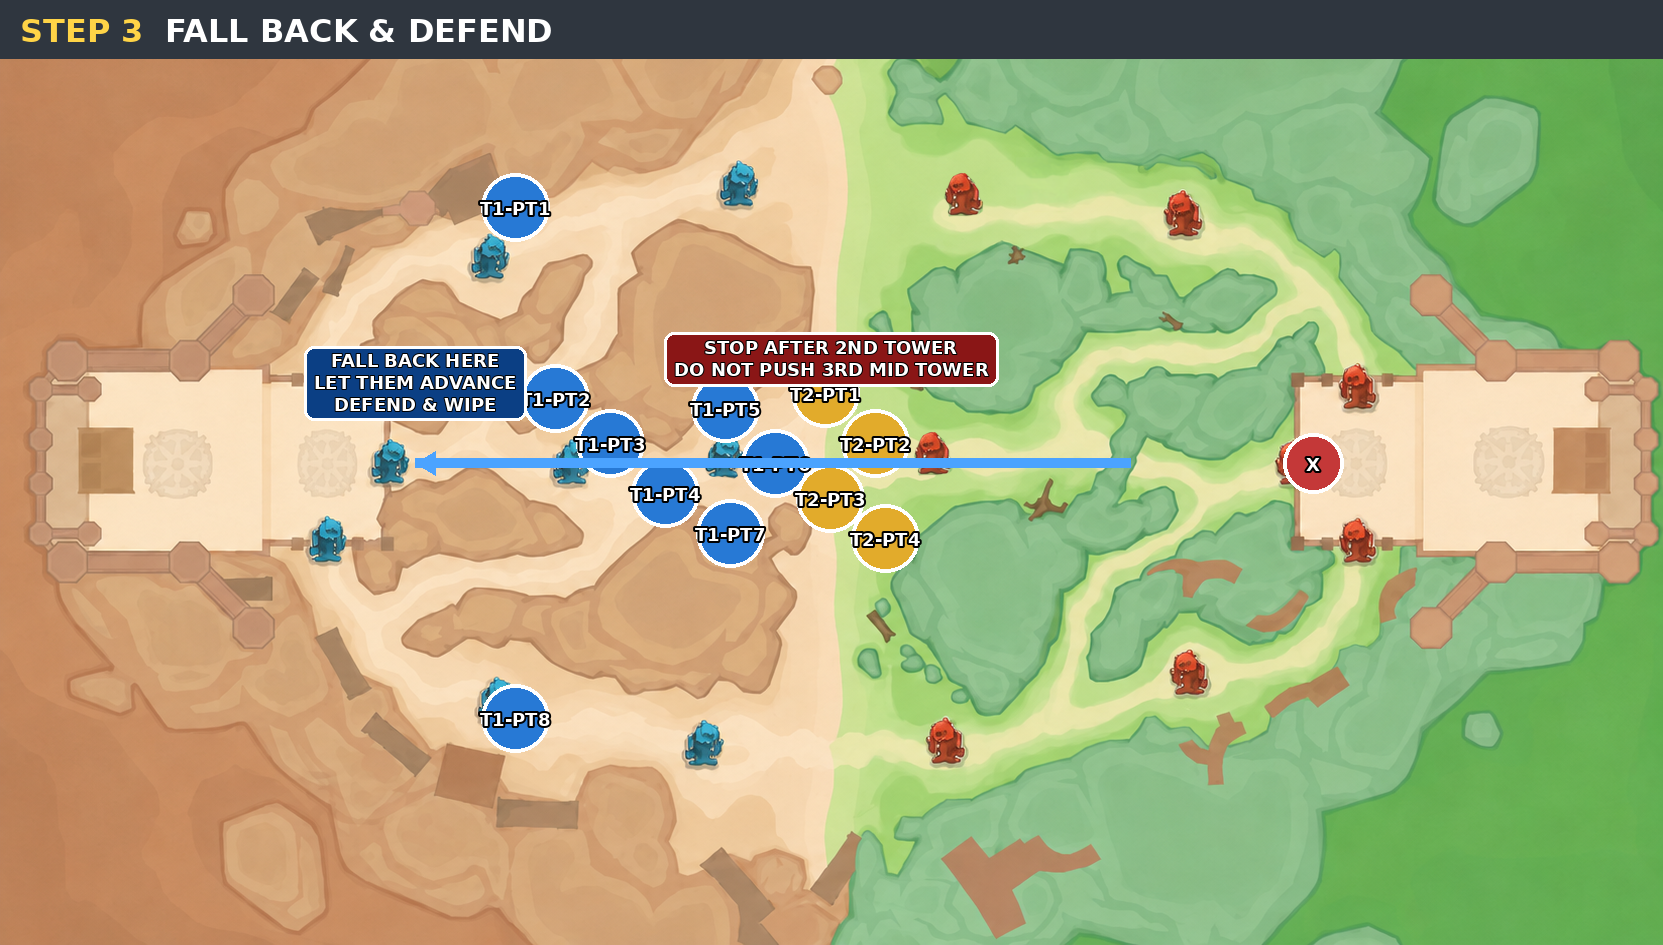
Step 3 fall back and defend map showing the team stopping after the second mid tower and falling back to defend.
  • After destroying the 2nd tower, stop pushing.
  • Do NOT attack the 3rd MID tower.
  • Fall back to our 1st MID tower.
  • Let the enemy advance toward us.
  • Defend and wipe their players at MID.
4

Team 2 Rotates Bottom

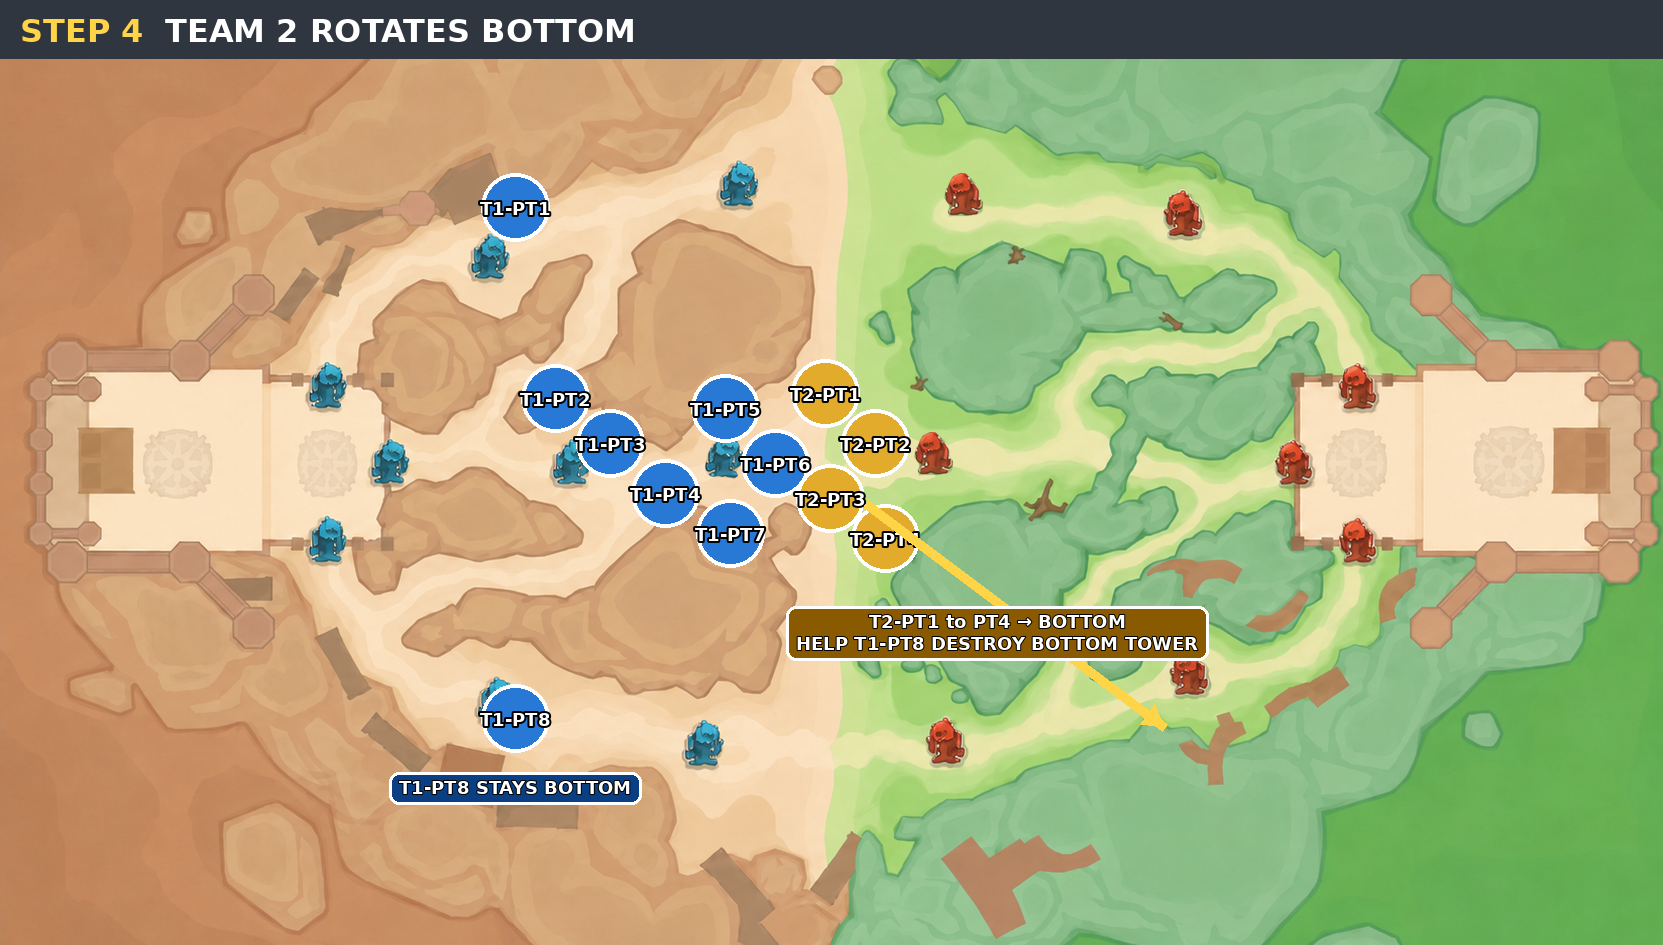
Step 4 map showing Team 2 rotating bottom to help Team 1 Party 8 destroy the bottom tower.
  • Team 1 continues holding TOP, MID, and BOTTOM.
  • Team 2 Parties 1-4 rotate to BOTTOM.
  • Help Team 1 Party 8 push and destroy the enemy BOTTOM tower.
  • Team 1 Party 8 must remain at BOTTOM.
5

Team 2 Returns MID

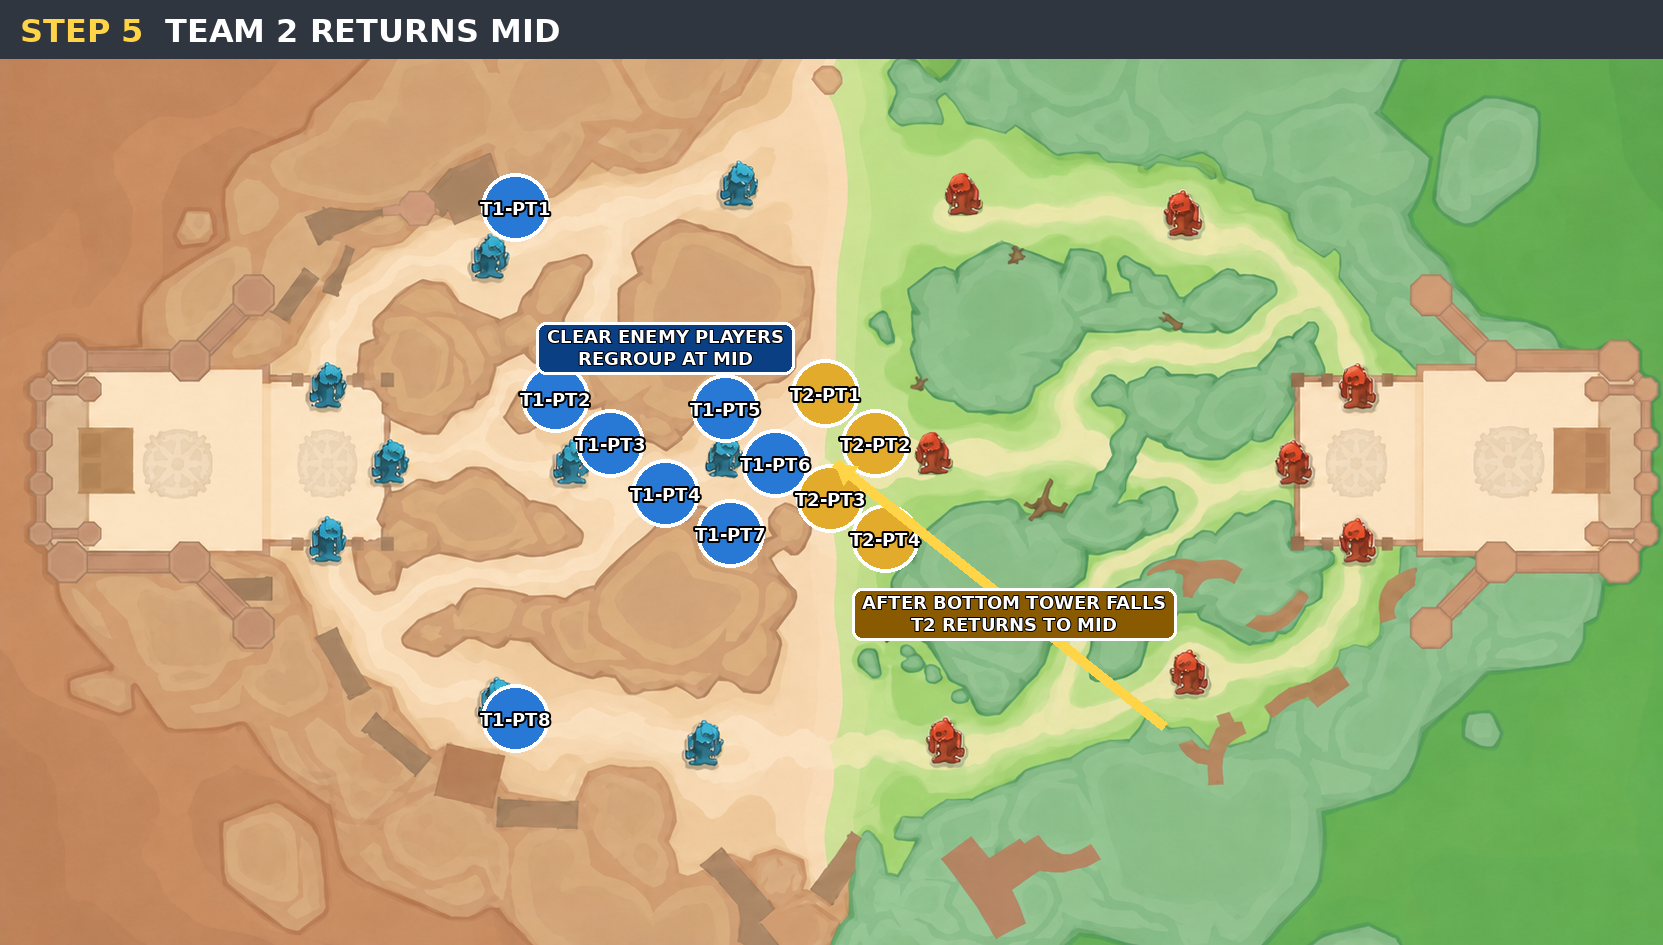
Step 5 map showing Team 2 returning to mid after the bottom tower falls and regrouping with the mid team.
  • Once the BOTTOM tower is destroyed, Team 2 immediately returns to MID.
  • Help Team 1 Parties 2-7 clear the enemy players.
  • Regroup before the next rotation.
6

Team 2 Rotates Top

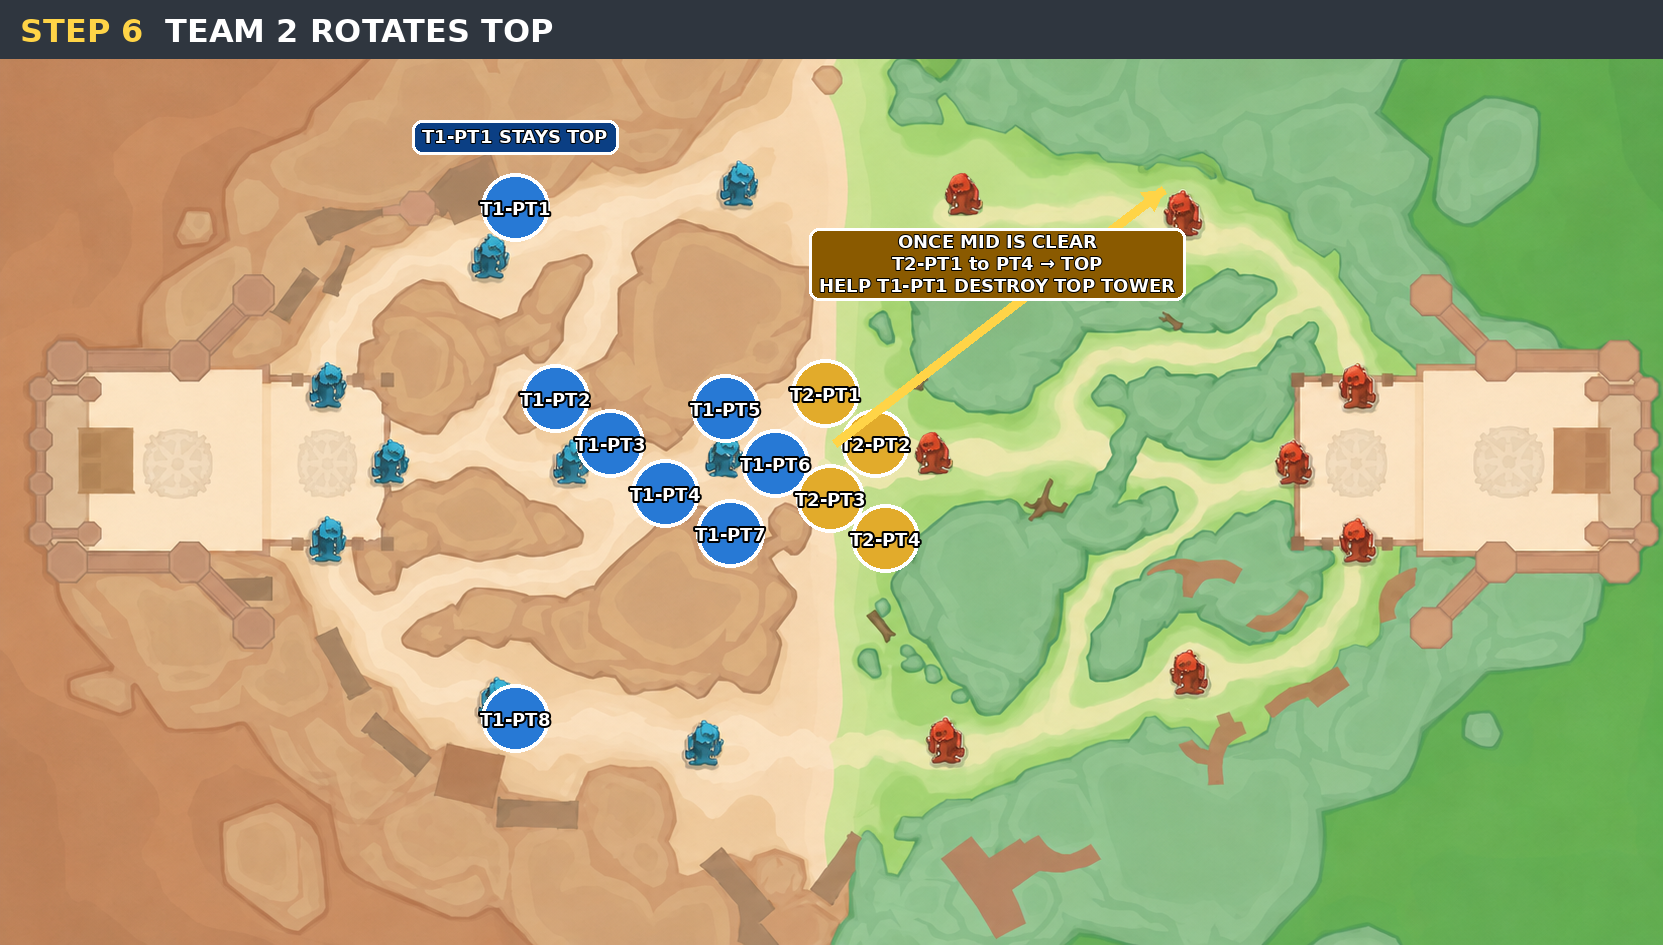
Step 6 map showing Team 2 rotating top to help Team 1 Party 1 destroy the top tower.
  • Once MID is clear, Team 2 Parties 1-4 rotate to TOP.
  • Help Team 1 Party 1 push and destroy the enemy TOP tower.
  • Team 1 Party 1 must remain at TOP.
7

Return To MID Again

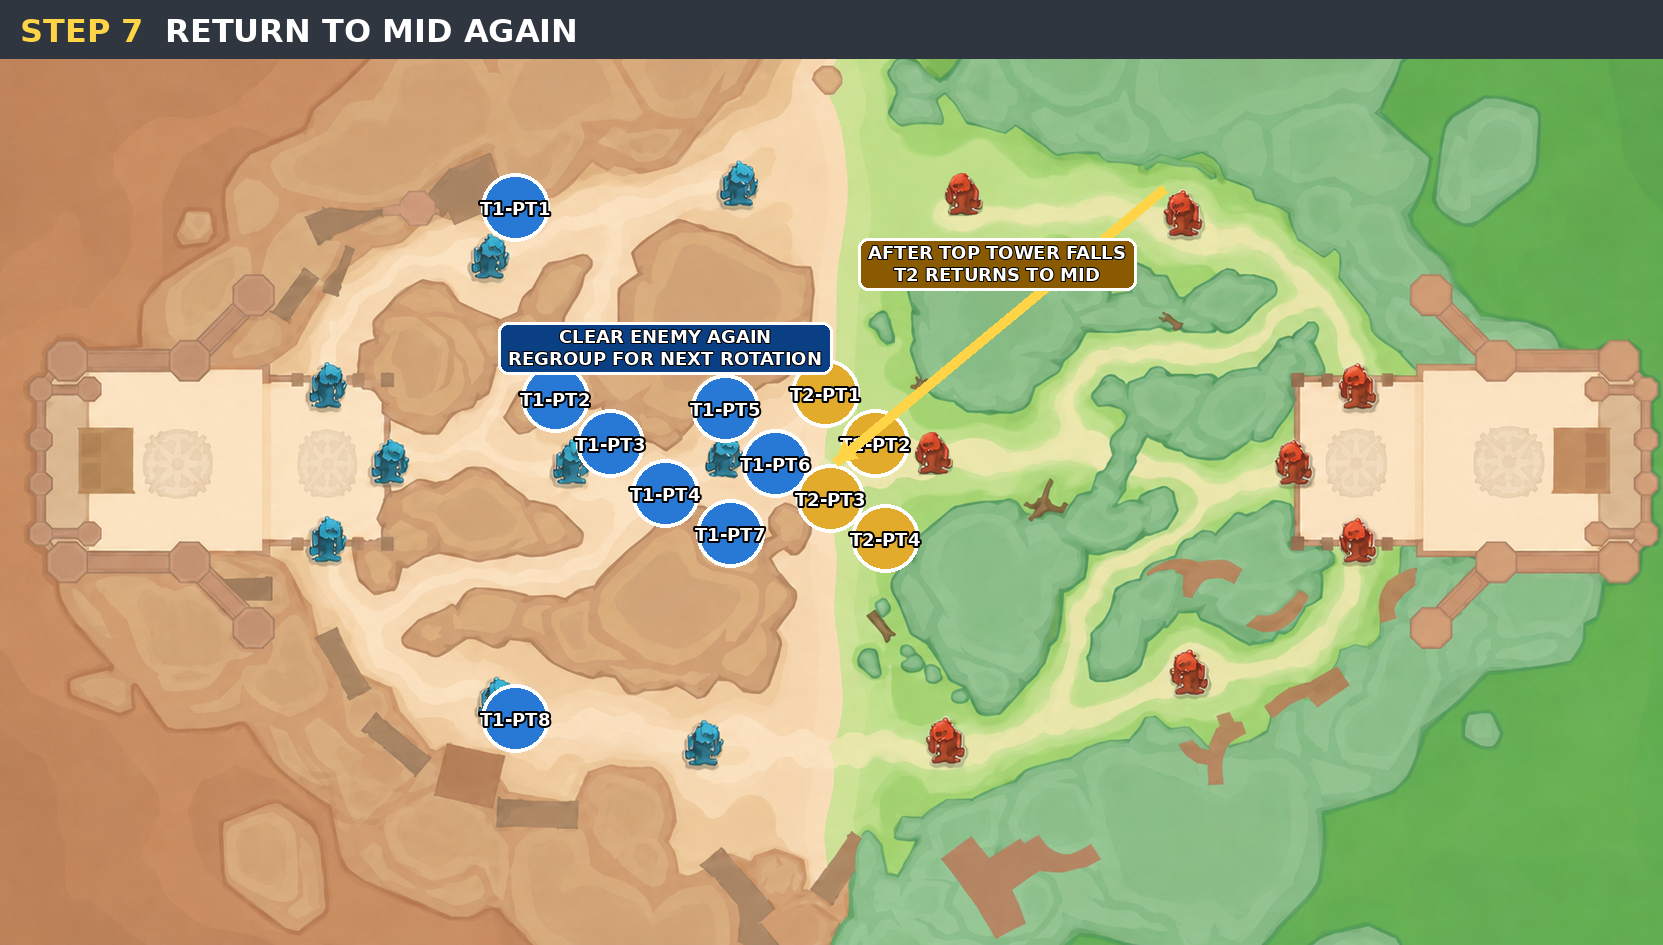
Step 7 map showing Team 2 returning to mid after the top tower falls and regrouping for the next rotation.
  • After destroying the TOP tower, Team 2 immediately returns to MID.
  • Clear the enemy team again.
  • Regroup and prepare for the next rotation.
8

Repeat Rotation

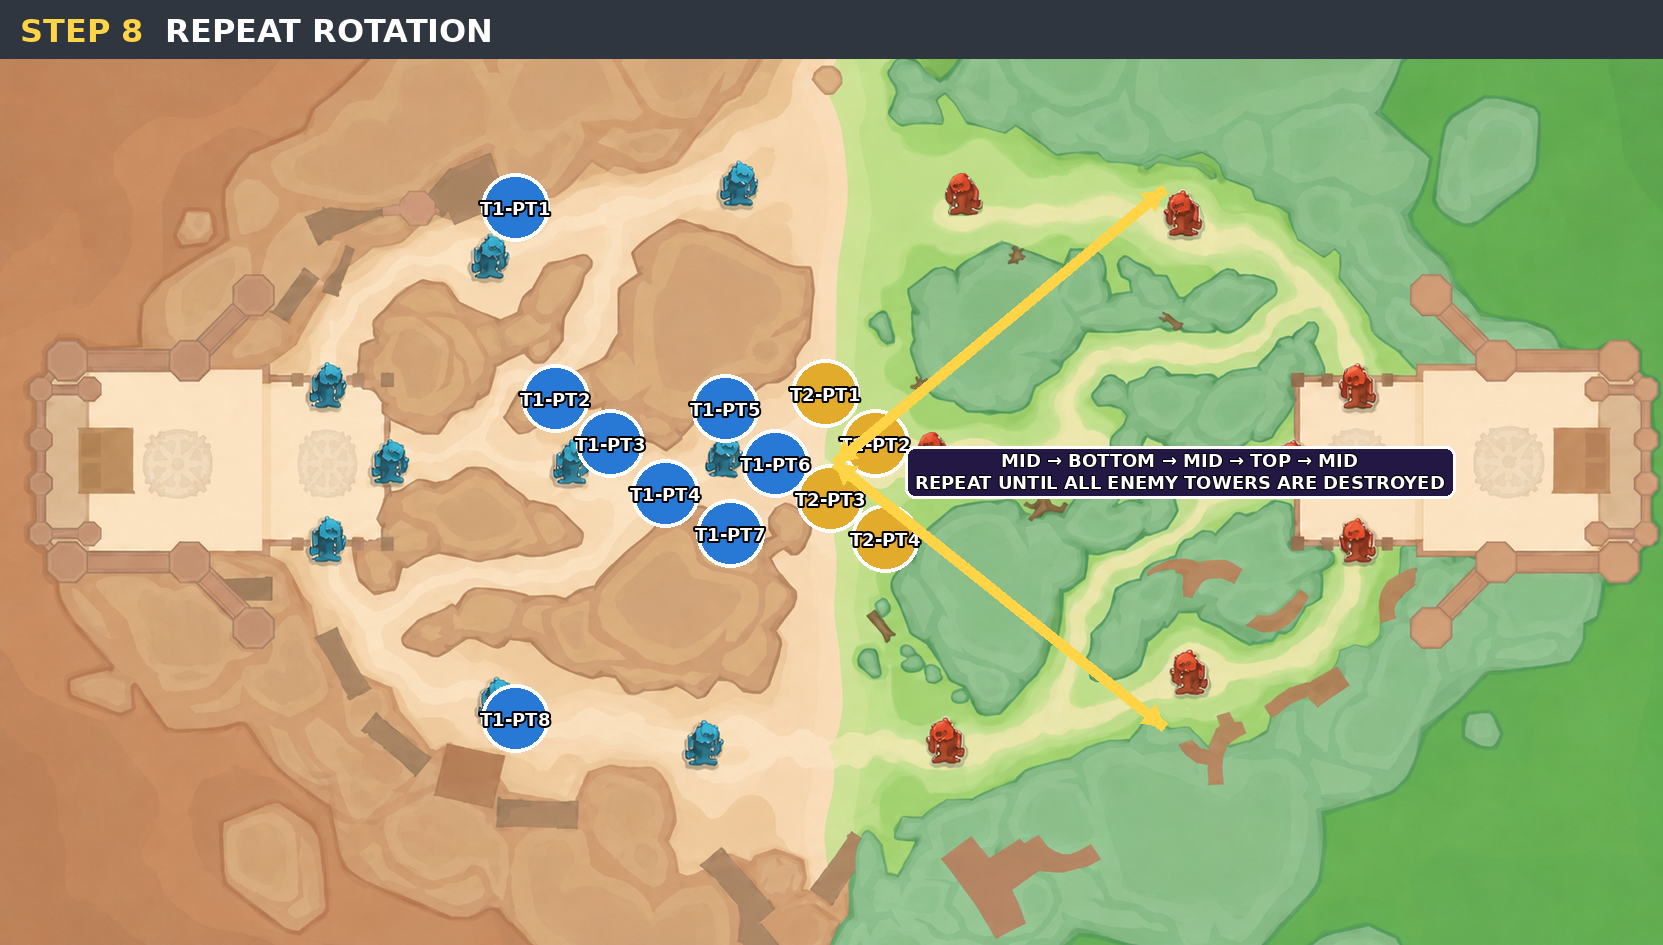
Step 8 repeat rotation map showing the MID to BOTTOM to MID to TOP to MID loop.

MID -> BOTTOM -> MID -> TOP -> MID

  • Keep repeating this rotation.
  • Continue until we destroy all of their towers.

IMPORTANT ROLES

Keep the structure.

Team 1 Party 1Always hold TOP.
Team 1 Party 8Always hold BOTTOM.
Team 1 Parties 2-7Control and defend MID.
Team 2 Parties 1-4Our main rotating force.
Do not overextend.Stop chasing and protect formation.
Always regroup at MID.Every rotation returns to MID first.

ROTATION SUMMARY

Quick command chain.

1. Push MID -> Destroy Tower 1 & 2 2. Fall back -> Defend MID 3. Team 2 -> BOTTOM 4. Team 2 -> Back to MID 5. Team 2 -> TOP 6. Team 2 -> Back to MID 7. Repeat until all towers are destroyed